「C++の応用 - C Sharp DLLの使用」の版間の差分
ナビゲーションに移動
検索に移動
編集の要約なし |
編集の要約なし |
||
| 14行目: | 14行目: | ||
| C# DLL側をCOM 参照可能にする || [CLIを使う]に変更しなくてよい || C++ EXEのコード量が増えて面倒である | | C# DLL側をCOM 参照可能にする || [CLIを使う]に変更しなくてよい || C++ EXEのコード量が増えて面倒である | ||
|- | |- | ||
| C# DLLに対するC++/ | | C# DLLに対するC++/CLIのラッパープロジェクトを作成して、C++ EXEから使う || [CLIを使う]に変更しなくてよい<br>COMを使用しない且つ元のプロジェクトの設定を変更したくない場合に使用可能 || やり方がスマートではない | ||
|} | |} | ||
</center> | </center> | ||
| 85行目: | 85行目: | ||
続いて、コマンドプロンプトを開いて以下のコマンドを実行して、.NET DLLExportを起動する。<br> | 続いて、コマンドプロンプトを開いて以下のコマンドを実行して、.NET DLLExportを起動する。<br> | ||
DllExport.bat -action Configure | DllExport.bat -action Configure | ||
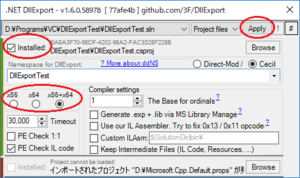
.NET DLLExportダイアログにて、[Installed]チェックボックスにチェックを入力して、[Apply]ボタンを押下する。<br> | |||
[[ファイル:.NET DLLExport.png|フレームなし|中央]] | [[ファイル:.NET DLLExport.png|フレームなし|中央]] | ||
<br> | <br> | ||
最後に、C# DLLのプロジェクトをリビルドすると、作成した関数がエクスポートされる。<br> | 最後に、C# DLLのプロジェクトをリビルドすると、作成した関数がエクスポートされる。<br><br> | ||
== C++/CLIのラッパープロジェクトを使用する方法 == | |||
<source lang="cpp"> | |||
// CSharpDLL.cs | |||
namespace CSharpDLL | |||
{ | |||
public static class CSharpDLLClass | |||
{ | |||
public static void ShowValue(ref int value) | |||
{ | |||
DialogResult result = MessageBox.Show("C# Message Box", "C# Message Box", MessageBoxButtons.OKCancel); | |||
if (result == DialogResult.OK) | |||
{ | |||
value = 1; | |||
} | |||
else | |||
{ | |||
value = 2; | |||
} | |||
return; | |||
} | |||
} | |||
} | |||
// CppCLI.cpp | |||
#include "stdafx.h" | |||
#include "ManagedDll.h" | |||
// CppCLI.h | |||
#pragma once | |||
using namespace System; | |||
using namespace System::Reflection; | |||
using namespace CSharpDLL; | |||
namespace ManagedDll | |||
{ | |||
public ref class DoWork | |||
{ | |||
public:void ShowCSharpMessageBox(int *value) | |||
{ | |||
CSharpDLLClass::ShowValue(*value); | |||
return; | |||
} | |||
}; | |||
} | |||
__declspec(dllexport) void ShowMessageBox(int *value) | |||
{ | |||
ManagedDll::DoWork work; | |||
work.ShowCSharpMessageBox(value); | |||
} | |||
// CppEXE.cpp | |||
#include "stdafx.h" | |||
#include "conio.h" | |||
#include <iostream> | |||
#include <windows.h> | |||
#include "ManagedDll.h" | |||
_declspec(dllexport) void ShowMessageBox(int *value); | |||
int _tmain() | |||
{ | |||
int *result; | |||
ShowMessageBox(result); | |||
if(*result == 1) | |||
{ | |||
printf("Ok Was Pressed \n"); | |||
} | |||
else | |||
{ | |||
if(*result == 2) | |||
{ | |||
printf("Cancel Was Pressed \n"); | |||
} | |||
else | |||
{ | |||
printf("Unknown result \n"); | |||
} | |||
} | |||
system("pause"); | |||
return 0; | |||
} | |||
</source> | |||
<br><br> | |||
__FORCETOC__ | __FORCETOC__ | ||
[[カテゴリ:C_Sharp]] | [[カテゴリ:C_Sharp]] | ||
2019年7月17日 (水) 03:27時点における版
概要
C++ EXEからC# DLLの関数を呼び出す方法は、幾つか方法が存在しており、各々にメリットとデメリットがある。
下記の表1に代表的な4種類の方法を示す。
表1. C++ EXEからC# DLLの関数を呼び出す方法
| 方法 | メリット | デメリット |
|---|---|---|
| C++/CLIを使う | 最も簡単 VisualStudioのIntelliSenseも使用可能 |
プロジェクトの設定で[CLIを使う]に変更する必要がある |
| C# DLL側で関数をエクスポートする | [CLIを使う]に変更しなくてよい GetProcAddressが使えるため、よく知られた方法で関数を呼び出す事が出来る |
C# DLL側のソースコードが無い場合は利用不可 |
| C# DLL側をCOM 参照可能にする | [CLIを使う]に変更しなくてよい | C++ EXEのコード量が増えて面倒である |
| C# DLLに対するC++/CLIのラッパープロジェクトを作成して、C++ EXEから使う | [CLIを使う]に変更しなくてよい COMを使用しない且つ元のプロジェクトの設定を変更したくない場合に使用可能 |
やり方がスマートではない |
上記の表1において、C++/CLIを使う方法とC# DLL側で関数をエクスポートする方法、C++/CLIのラッパープロジェクトを作成する方法を
下記にて紹介する。
C++/CLIを使う方法
Visual C++のプロジェクト設定を開いて、[共通言語ランタイム サポート (/clr)]に変更する。
 // SampleDLL.cs
 namespace SampleDLL
 {
    public class Class1
    {
       public static int Sum(int a, int b)
       {
          return a + b;
       }
    }
 }

 // SampleEXE.cpp
 #include <Windows.h>
 #include <iostream>

 #using "SampleDLL.dll"
 using namespace SampleDLL;

 int main()
 {
    std::cout << Class1::Sum(1, 2) << std::endl;
    return 0;
 }
C# DLL側で関数をエクスポートする方法
まず、プロジェクトを作成してソースコードを記述する。
 // SampleDLL.cs
 namespace SampleDLL
 {
    public class Class1
    {
       [DllExport]
       public static int Sum(int a, int b)
       {
          return a + b;
       }
    }
 }

 // SampleEXE.cpp
 #include <Windows.h>
 #include <iostream>

 typedef int (*Sum)(int a, int b);

 int main()
 {
    auto hModule = LoadLibrary(L"DllExportTest.dll");
    auto sum = reinterpret_cast<Sum>(GetProcAddress(hModule, "Sum"));
    std::cout << sum(1, 2) << std::endl;
    return 0;
 }
次に、DllExport.batをダウンロードして、DllExport.batをC# DLLのslnファイルと同じ階層に配置する。
続いて、コマンドプロンプトを開いて以下のコマンドを実行して、.NET DLLExportを起動する。
DllExport.bat -action Configure
.NET DLLExportダイアログにて、[Installed]チェックボックスにチェックを入力して、[Apply]ボタンを押下する。

最後に、C# DLLのプロジェクトをリビルドすると、作成した関数がエクスポートされる。
C++/CLIのラッパープロジェクトを使用する方法
 // CSharpDLL.cs
 namespace CSharpDLL
 {
    public static class CSharpDLLClass
    {
       public static void ShowValue(ref int value)
       {
          DialogResult result = MessageBox.Show("C# Message Box", "C# Message Box", MessageBoxButtons.OKCancel);
          if (result == DialogResult.OK)
          {
             value = 1;
          }
          else
          {
             value = 2;
          }

          return;
       }
    }
 }

 // CppCLI.cpp
 #include "stdafx.h"
 #include "ManagedDll.h"

 // CppCLI.h
 #pragma once

 using namespace System;
 using namespace System::Reflection;
 using namespace CSharpDLL;

 namespace ManagedDll
 {
    public ref class DoWork
    {
       public:void ShowCSharpMessageBox(int *value)
       {
          CSharpDLLClass::ShowValue(*value);
          return;
       }
    };
 }

 __declspec(dllexport) void ShowMessageBox(int *value)
 {
    ManagedDll::DoWork work;
    work.ShowCSharpMessageBox(value);
 }

 // CppEXE.cpp
 #include "stdafx.h"
 #include "conio.h"
 #include <iostream>
 #include <windows.h>
 #include "ManagedDll.h"

 _declspec(dllexport) void ShowMessageBox(int *value);

 int _tmain()
 {
    int *result;

    ShowMessageBox(result);

    if(*result == 1)
    {
       printf("Ok Was Pressed \n");
    }
    else
    {
       if(*result == 2)
       {
          printf("Cancel Was Pressed \n");
       }
       else
       {
          printf("Unknown result \n");
       }
    }
    system("pause");

    return 0;
 }